(reprinted from RE/P Magazine, February 1992)
Because mixing to digital mercilessly reveals the slightest anomalies on a multitrack master, proper maintenance of analog multitrack heads is essential to ensure a flawless ADD recording. Why do tape heads require periodic maintenance and eventually wear out? Let's take a stroll and ponder the problem.
We'll start at what should be a familiar location: the New York Hilton. We'll walk down Sixth, past Rockefeller Center, cross 42nd Street with a wary glance towards Times Square, past Bryant Park, through Herald Square, angle off down Broadway at a brisk pace, take a short breather at Madison Square Park before puffing away down Fifth Avenue toward Greenwich Village, past 20th Street, and …STOP! We've covered about 1.7 miles. That's how much tape passes over the heads of your multitrack in one hour of continuous operation at 30 ips. Magnetic recording tape is mildly abrasive and eventually your heads will wear to the point where no amount of tweaking will keep your machine performing to full spec.
How long you can go until you reach that point, and what to do when you get there will be discussed shortly. But first, let's take a look at those heads and see what they're made of. No matter what make or model multitrack recorder you have, your record and playback heads are virtually certain to be made of some type of laminated, high permeability metal. The most common metals used in head manufacturing are MuMetal, Permalloy and now, Amorphous metals (amorphous materials are actually more complex than "metal" implies, but for now we’ll let it go at that). Some materials are softer and some harder, but they all will wear pretty much the same way, although not necessarily at the same rate! The exception is your erase head, which is likely to be made of ferrite, so we will deal with it separately. For now, we will focus on progressive wear of metal heads.
HEAD WEAR: CONTRIBUTING FACTORS
The primary factors determining amount of head wear are total hours in service and tape speed, which together give total tape passage over the heads. Tape tension also contributes, because higher tension will increase the rate of wear. Tape path cleanliness can also be a factor because grit and grunge caught between tape and heads will not only degrade immediate performance, but also increase the rate of wear. The abrasiveness of the tape is a factor, though there seems to be little significant difference between tape types. Finally, ambient temperature and humidity may also play a role. Extremes of temperature and humidity do affect the tape, and there is some evidence, albeit inconclusive, that climate factors may influence head wear as well. In most well maintained studios, total hours in use will be the primary factor in determining the degree of head wear. The length of time heads can stay in service before reconditioning or replacement becomes necessary will vary, but our experience shows considerable degradation of performance on 16- or 24-track 2-inch heads at between 1,800 to 3,000 hours of use, or around 18 to 24 months of operation in a busy studio. Some of the newer amorphous metal heads introduced in the past few years exhibit longer wear characteristics, but not enough of them have arrived for refurbishing at JRF for us to accurately predict the amount of increased longevity.
NORMAL WEAR PATTERN
Assuming the tape path and head assembly have been properly aligned, the wear pattern on the heads will resemble the left side of the first diagram below. The pattern will be rectangular, and centered over the gap. The flaring at the top and bottom of the head is common, and is usually present on all heads. This results from the curling effect of tape under tension, which tends to wear the heads slightly deeper at the edges. Most newer heads have edge relief slots machined into the surface of the head (at the edge of the tape path). These slots prevent the formation of a "lip," or abrupt surface anomaly, at the edge of the head wear pattern. When the edge of the tape bumps against this lip, due to slight variations in tape slitting or jitter in the tape path, severe edge track instability results. Edge relief slots solve this problem by preventing formation of an abrupt edge. Picture the surface of the heads as a bowling lane, with the edge relief slots as the ,gutters; the tape is just slightly wider than the lane, with the edges over the gutters. Edge relief slots help keep the normal wear pattern uniform, and considerably delay the onset of edge track instability. Nearly all new heads have edge relief slots, but many older heads being reconditioned do not have them. We usually recommend that edge slots be machined in as part of reconditioning (at a charge of $30 to $45), if there is sufficient gap depth remaining to warrant it.
(Click on the diagram to see a clearer version in a new window)
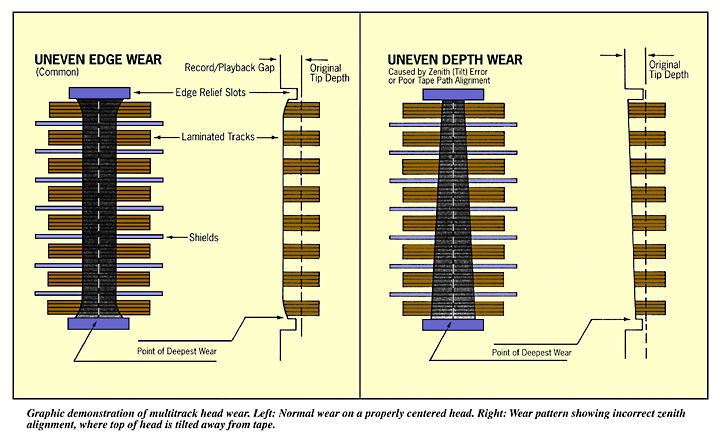
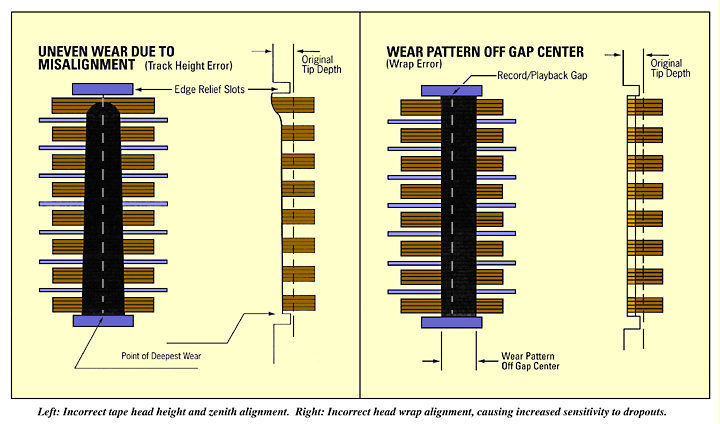
Tape recorders are complex mechanical systems, and often problems will arise which, if left uncorrected, cause abnormal head wear. Abnormal wear patterns (see figures) caused by tape path misalignment can prove costly, since correcting them usually requires removal of much more useable head material during reconditioning, thereby reducing the overall life of the head. Proper alignment of all tape path components on the headblock is an exacting procedure, and should be performed only by a qualified technician. Precision realignment is essential any time heads are reconditioned or replaced.
Assuming your tape path is properly aligned, there are several things you can do to extend the life of your heads and minimize reconditioning costs. First, keep your tape path as clean as possible. Second, keep your tape tension within recommended spec. Sometimes there is a temptation to cure immediate stability problems by increasing tape tension, but this will only delay the inevitable while increasing the rate of head wear.
During the course of normal wear, the performance of a head will vary as material is removed and the geometry of the contour changes. Up to a point, you can compensate for this change in your electronic alignment. But, when wear gets to a certain point, maintaining optimum performance on all tracks becomes impossible. What then?
ISOLATING THE PROBLEM
The first thing you want to do is make sure the problem really is caused by worn heads. All too often, we get calls at JRF from panicked studio owners who are convinced their heads are shot when really they have nothing more than a minor problem with their tape or tape path.
As a general rule of thumb, a tape head will not develop a major problem overnight. When somebody calls and says, "I came in this morning and suddenly my tracks are bouncing all over the place and I need to have somebody look at my heads," we generally try to dig a little deeper. If everything was fine yesterday, we try to find out what is different today? Different tape? Different use of the machine?
Sometimes something as simple as flipping a tape over can eliminate heads as the source of trouble. If you have instability on track 1 and it moves to track 16 after flipping the tape, then your problem is likely with the tape and not with the heads.
On the other hand, if somebody calls and says, "This has slowly been getting worse for weeks, and today I decided I just couldn't stand it anymore," then I tell them to pull the headblock and send it in.
It is a good idea to regularly monitor the condition of your heads throughout the wear cycle, and the best way to do this is with a standard alignment tape. (This may seem ridiculously obvious, but you'd be surprised how many studios do not have alignment tapes for all speeds and formats.) If you don't have an alignment tape, and are dead set against buying at least one, then record tones at 1kHz, 10kHz and 16kHz when your heads are new or freshly reconditioned, and keep it as a continuing reference. Every so often, put the tape on and check the stability of your levels. This is often the best way to monitor head condition, because many recorders do not have hour meters, and sometimes owners of machines with hour meters are lax in their record keeping.
FIRST SIGNS OF TROUBLE
On multitrack recorders, the first sign of trouble is usually edge track instability. Levels will start to bounce on the top and bottom tracks, gradually getting worse, and then moving in to the second and next-to-bottom tracks. At what point reconditioning becomes necessary is somewhat subjective, since some customers will tolerate much more instability than others. Most of our customers find something needs to be done when their heads have worn between 2.5 and 3 thousandths of an inch.
In the case of extreme wear or with abnormal wear patterns, other problems may develop: dropouts, loss of high frequency response, midrange bump, increased distortion, increased noise, unstable tape path, tracking error, oxide buildup or shedding or insufficient erasure.
(Click on the diagram to see a clearer version in a new window)
Does any of this sound familiar? If your multitrack has been in average to heavy use for more than two years, there is a good chance that worn heads are degrading your machine's performance. If you bought your machine new, you almost certainly do not need new heads, because unacceptable performance occurs well before 50% of total tip depth has been worn away. It may be time for reconditioning, which normally costs only a fraction of the price of a new head.
THE RECONDITIONING PROCESS
It's a good idea to call the head refurbishing company before you remove your heads from your recorder. The company's technician will take some time to discuss your specific problem, isolating the probable cause before you spend time and money sending in your head assembly. It is important, if at all possible, to send the entire headblock assembly to the refurbishing company, so that precise tape path alignment can be performed after the heads are reconditioned. The following description of our procedures at JRF Magnetic Sciences outlines services you should expect from any quality head reconditioning company.
Upon arrival, each headblock assembly undergoes an initial inspection and testing procedure before the heads are removed. First, each head is visually inspected under a microscope (up to 600 power) to determine condition of the gap, core, laminations and ferrite material. Scratches, dents, voids, erosion, pitting, or unusual wear phenomena are noted. Visual inspection at this stage also helps establish a rough estimate of remaining head life.
The heads then receive thorough electrical testing. Inductance is measured at 1kHz, using a digital LCD bridge. Because the inductance of a magnetic head drops predictably as it wears, by comparing the head under test to wearout specifications on file for the exact head type, it is possible to estimate remaining head life with fair accuracy, even when actual tip depth measurements are not possible. This test also reveals open or shorted coils, shallow tip depths, sprung gaps, and cracked or damaged cores prior to dismount from the head assembly. Readings are in millihenrys, and each track is measured and documented separately.
The LCD bridge is also used to perform the dc resistance test. This is simply a continuity reading, measured in Ohms, across each track. This test will detect poor solder connections, shorts, or internal wire breaks.
All of the above tests, along with an overall inspection of the head assembly are performed before removal of the heads. At this point, the customer is often contacted to discuss options and anticipated costs. It the customer decides to go ahead with reconditioning, the heads are then removed from the headblock assembly. Many heads are manufactured with a machined reference mark for measuring tip depth. Once these heads are out of the shield housings, the remaining tip depth can be measured with precision, allowing a reliable estimate of remaining life. Before relapping begins, precision contour tracings are established on optical measuring equipment.
The heads are then recontoured to exacting tolerances using lapping films appropriate for the head material. Relapping is the precise and careful removal of material from the ramp (angled area) and radius area. The process continues down to, but does not exceed, the deepest point of head wear. At JRF, ferrite erase heads are then polished using a proprietary diamond vapor spray. Following this, the heads are again carefully inspected before remounting in the headblock assembly.
HEAD ASSEMBLY ALIGNMENT
The head assembly is set aside for at least an hour to allow stress relief of components before optical alignment. This is an extremely exacting visual and electrical/digital measurement process which references industry standard specifications for tape widths, track placement locations, and specific tolerances adhered to by the original manufacturers. At JRF, the procedure includes:
- Cleaning of the entire head assembly.
- Rotation of all fixed guides and posts.
- Cleaning of flutter idlers and roller guides.
- Cleaning and oiling of all lifters, gates and mechanisms.
- Correcting and aligning tape height references.
- Setting all tape path components for correct azimuth and zenith.
- Aligning heads for track placement (within ± 0.0005")
- Aligning head stacks for azimuth and zenith (within ± 0.0005").
- Setting the wrap on each head stack for gap centering on tape contact area (within ± 0.002").
- A complete quality control re-check of all above items.
Final gap inspection places special emphasis on gap sharpness, laminations, polish consistency, contour consistency and overall surface conditions.
The final inductance test will show a slight drop from the initial test, reflecting the amount of material removed in the relapping process. After all tests are completed, the head assembly is given a final cleaning and a protective cover is applied. Complete documentation is shipped back to the customer with the assembly, and all data is kept on file at JRF for future reference.
RECONDITIONING COSTS
As of this writing, the cost for the above services varies from about $300 for a half-inch 8-track assembly to about $450 for a 2-inch 24-track assembly. When you consider that a new 24-track head can cost as much as $6,000, the savings realized from refurbishing can be substantial.
When are heads too far gone for reconditioning? Again, the answer to this question depends to some extent on circumstances and the customer's particular financial situation. Almost all heads can benefit from reconditioning at least once, and most two or three times. But when the tip depth gets down to what we term "marginal," we consult with the customer carefully before proceeding. If heads on are on the "hairy edge" of wearing through, but the studio simply cannot afford new heads, we may reluctantly go ahead and relap, though in such cases we cannot guarantee remaining head life. This scenario requires an unbelievable amount of added care (not to mention stress) because the parting words from the customer are usually, "Oh God, please don't let it go through!"
In most cases, however, the studio will not want to deal with the process again in the short term, and will elect to replace the heads. Also, in rare instances, a financially strapped customer will elect to live with the marginal head performance a little bit longer, so we will return the assembly as-is.
Interestingly, the performance characteristics of a properly reconditioned playback head will actually improve as it wears. As the tip becomes shallower, the head becomes more efficient. The best performing playback head in the world is one that is just on the edge of going through the gap. So, if your playback head has a good surface, it's okay to keep using it right until it wears through.
Record heads are a different case as they approach the end of their working life. The signal is applied with the flux trying to bridge the record gap, but with only a sliver of tip depth remaining, the pole tip can saturate. This leads to increased distortion, biasing problems and, because you are driving the record head harder, increased adjacent channel crosstalk.
REINSTALLING YOUR HEADBLOCK
The reinstallation of a properly refurbished and optically aligned head assembly usually requires no more than minor tweaking of azimuth for optimum phase response, along with the standard electronic calibration procedure. Tape tension should be checked and reduced to the minimum acceptable OEM specified setting.
When you put in a new or relapped head, you can usually peak the output by playing with the tape wrap. This is a dangerous practice, and is not recommended. Making such adjustments will start developing an abnormal wear pattern based on the temporary peak, whereas after a few days, if you had left it alone, you would have had a nice, even pattern centered on the gap. Leave the wrap alone unless you are absolutely sure of what you are doing.
ADD: ALIVE AND WELL
Despite the forecasts of all-digital proponents, analog multitrack recording is alive and well. The combination of analog tracking and digital mastering, particularly at the project studio level, has kept business booming here at JRF. Because, when you end up on digital, you absolutely have to start out with analog heads that are "up to snuff". •